
By Ed Greenwell, Director of Tennessee Projects, American Chestnut Cooperators Foundation 4120 Woodview Drive, Cookeville, TN 38501
As submitted for publication in the NNGA "Nutshell" Quarterly Publication © 2002
About 5 years ago, I became aware that there were organizations involved in American Chestnut restoration that had made progress in fighting the battle against Chestnut Blight. I knew from reading a Boy’s Life article almost 30 years ago that there were American Chestnuts surviving in Michigan, but didn’t realize any trees or sprouts still existed in Tennessee. Intensive web research revealed the organization most aligned with my purist interests, the American Chestnut Cooperators’ Foundation, an organization having success in breeding pure American Chestnuts with some blight resistance. Now that I had found the trees and the organization, I needed a cloning method that would allow me to become immediately involved in propagating and breeding the fast fading gene pool of local trees and sprouts in the Nashville Basin and Highland Rim areas of Tennessee, without waiting some years for growing rootstocks or endangering the few remaining sprouts by transplanting them to an orchard.
Further web research revealed an obscure method referred to as “Nurse Nut Grafting” or “Nut Grafting” but no procedure for this method was available on the web. After much questioning of many individuals by e-mail, Dr. Sandy Anagnostakis suggested that I read through the chapter on Chestnuts in the NNGA green book “Nut Tree Culture In North America” edited by Dr. Richard Jaynes. With much appreciated guidance from Darren Corrigan, Lucille Griffin, Dr. Gary Griffin and Dr. John Rush Elkins of the American Chestnut Cooperators’ Foundation and NNGA, I modified the following nut grafting technique by Dr. Jaynes to suit my needs.
“Nut grafting is a unique grafting method whereby a dormant scion is grafted into a nut that has started to germinate (Figure 1).
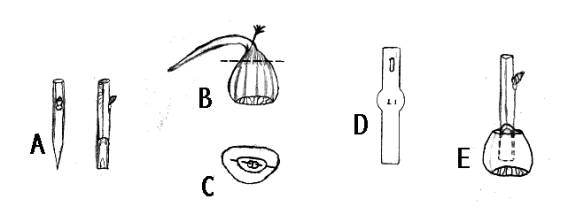
FIGURE 1. Nut graft. A) Two views of a Scion prepared with wedge-shaped cut, B) Geminating nut. Dashed line, indicates cut that will remove root and shoot. C) The shoot and root of nut removed. Dashed line indicates where knife blade is inserted into nut through the petiole stubs. D) Exacto type knife blade used to cut into nut. E) View of completed graft, scion inserted into nut.
The root and shoot of the nut are discarded. The cut surface, specifically the cambium, of the scion is placed against the cut surface of the petiole stub. Roots develop from the nut tissue adjacent to the scion. Grafted nuts are placed in a closed, heated frame containing a medium of 5 parts peat moss and 2 parts vermiculite that is kept 70°F to 75°F. Roots form within 3 weeks and in 4 weeks hardening of the grafts can begin with gradual ventilation. Several years of testing have given erratic results.”(Jaynes)
The scionwood should be stored in the crisper of your refrigerator and wrapped as for shipping until you get ready to graft. Collected scionwood should be of last season’s growth (terminal growth). When collecting, scionwood should be placed in identity labeled plastic bags and put in a cooler of ice to keep fresh. When storing, first wrap the scionwood tightly with cellophane wrap and label the source, then place in a tightly sealed Ziplock bag, removing as much air as possible before placing in the refrigerator. Scionwood treated in this manner should remain viable for some months if the storage temperature is 33°F to 40°F. Do not freeze.
Nuts require chilling for a couple of months in damp peat moss and will often begin sprouting regardless of temperature when this requirement is met. The nuts can be encouraged to sprout after they are chilled long enough by leaving them in their storage bag with moist peat moss at room temperature for a few days. I insert a square shaped exacto knife into the nut instead of a regular knife blade. The thin blade is about 1/4 inch wide and doesn't damage the nut as much as a standard knife does. I use a one-sided razor blade to cut my nuts and scions, cleaning it and the exacto knife with a paper towel dampened with alcohol after each cut.
After grafting the nuts, carefully put grafts from each tree in a labeled plastic bag with moist peat moss (a little moister than when storing nuts in the refrigerator). Make sure nut and scion are completely covered to prevent desiccation of new grafts. Poke 10-12 small holes in the bags for aeration with a needle or straight pin. Place the bags where they can get a little indirect light and will stay at a constant 70°F to 75°F. Check on the nuts often. It is usually a good sign if the scions begin to callous at the insertion point. Any nuts that begin to mold should immediately be removed. Make sure that the peat moss does not become dry. The nuts should begin to sprout roots as the petiole stubs grow out of the nut. An important note here is that the roots form from nut petiole stubs and not from the scion itself.
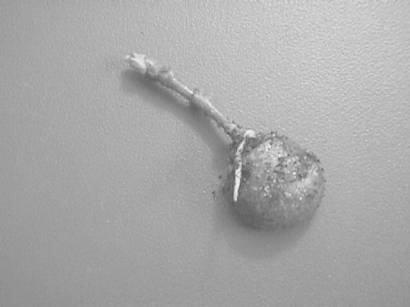
FIGURE 2. Nut graft beginning to root.
The grafted nuts should be removed from the bags as soon as the buds begin to swell. Plant the grafts in small peat pots with damp peat moss and place in Ziplock bags. Soak the peat pots in water before potting to prevent them from wicking the moisture out of the peat. Be sure to carefully dust the peat moss off of the bud and bury the graft union. The bag is kept sealed, opening it once every other day or so to change the stale air. A few pinholes in the bag may work instead of repetitive opening and closing. Be careful to keep the peat moss slightly moist at all times. If moisture is needed, put a few drops of water in the pot, being careful not to directly water the nut (circle the nut with a few drops). Due to the nature of this procedure, the cut surfaces and graft union can not be sealed, therefore, too much moisture or water coming in contact with the graft may cause it to fail.
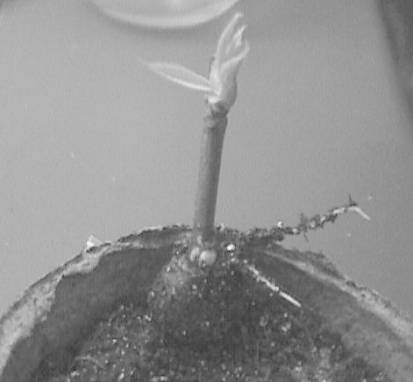

FIGURE 3. Sprouting nut graft showing root development (Top). Nut graft beginning shoot growth (Bottom).
As the grafts begin to grow, use your own judgment when gradually exposing them to more direct sunlight and air. When the weather becomes warmer, the nutgrafts can be potted in plain potting soil and gradually be moved to full sun outside. A greenhouse is helpful with large numbers of nutgrafts, but is not a requirement. The kitchen table works well with small numbers until more light and space is needed.
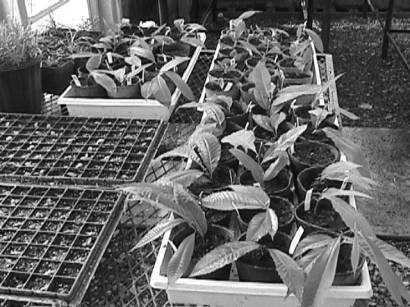
FIGURE 4. Trays of young nutgrafts in Tennessee Tech University greenhouse.
I have found that my success rate varies greatly with scions from different sources but overall has consistently approached 75% and near 100% for individual trees year after year. Although I have not conducted extensive scientific trials, from my experience other species and hybrids generally do not graft well on American nuts. An example of this is the Clapper that is used in hybrid timber breeding. I have no enduring successful grafts with Clapper out of many attempts on American nuts but do have some successes with it on hybrid nuts. An exception to this generalization is the NHR2T2 advanced hybrid (BC2) from Dr. Sandy Anagnostakis in Connecticut, which grafts better than some pure American scions on American nuts. My successes with American scions on Chinese and Hybrid nuts has also been limited as a general rule. This may give additional credence to Dr. Frank Santamour’s isozyme peroxidase typing theory since the matching of phloem fiber bundles is not an issue when nutgrafting.
FIGURE 5. Tall nutgraft (34") showing burs and catkins the same year grafted.
Under the best conditions, first year nutgrafts can grow three feet or more the year of grafting and some of my grafts have produced nuts the same year as grafted. Many potted grafts produce male catkins the year after grafting, offering a portable pollen source for limited application. As a rule, most nut grafted trees must be staked the first year and sometimes the second to force upright growth.
I routinely dissect failed grafts to observe possible causes and have found three factors that may contribute to failure, barring some type of incompatibility. One cause may be cotyledon irregularity, where the petioles form at odd angles to the cotyledons in the nut. In this case, slicing into the nut may actually sever the petiole stubs deep inside the nut, prohibiting a union producing roots. Another is fungus/mold infection from diseased nuts, direct water exposure or contaminated knife blades. The last observed factor is weevil infestation. Even nuts treated with a 20-minute hot water bath may have some damage from underdeveloped larvae. These nuts appear outwardly sound but often fail a graft.
The materials required for nut grafting are inexpensive and readily available. Although nutgrafting may not be a commercial alternative to traditional grafting methods, it does offer an inexpensive and relatively simple way to clone Chestnuts under the right care and conditions, without the time and expense required to grow or purchase traditional rootstocks. Nut grafting can also provide quick pollen sources necessary for strategic breeding work and reduce off-site travel for pollen collection. In addition, the grafts are performed and initially grown in isolation, making it easy to screen for diseases and pests without directly introducing them into the local environment.
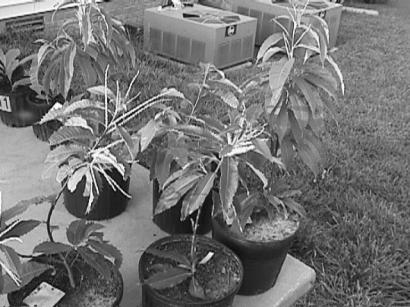
FIGURE 6. Potted second year nutgrafts showing male and female catkins.
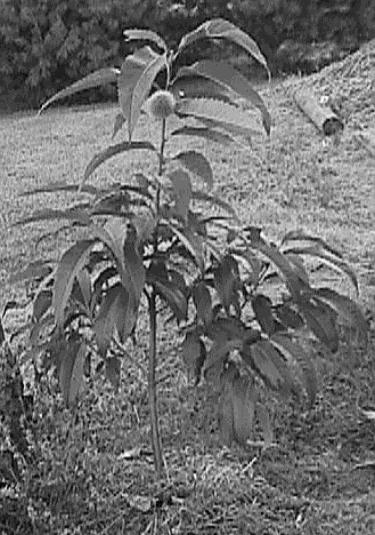
FIGURE 7. Planted 2nd year, 54" tall American Chestnut nut graft.
Note the very large leaves indicating a sound graft union and strong root system.
From my experience to date, nut grafting appears to be a viable method of obtaining breeding material with the expectation of long-term survival without the difficulty of carefully matching phloem fiber bundles for successful grafts. ð